Guide
How to design a landmark MOC in bricks
Design your own landmark model in bricks: choose a scale, block out the silhouette in studs, pick a few true colors and capture the details people recognize.
A MOC, short for “My Own Creation”, is any model you design yourself rather than build from a boxed set. Landmarks are one of the most popular subjects for a first MOC, and for a good reason: everyone already knows what the finished model should look like. That is also what makes them hard. A house can be any house, but a model of a famous tower has to be recognizably that tower, or it is just a tall brick stack.
The process below works at any size, from a desk model of a few dozen parts to a display piece of several hundred. The landmark builds on Brick Recipe serve as worked examples; open any of them in the 3D viewer and step through to see a decision being made.
Decide on a scale first
Every later choice depends on how big the model will be, so settle that before you place a single brick. A useful way to think about scale is not in centimeters but in how many studs the narrowest important feature gets. If a column, a tower leg or a window is only one stud wide, every other part of the building has to be measured against that one stud.
Roughly, landmark models fall into three groups:
| Scale | Typical size | What you can show | Example on this site |
|---|---|---|---|
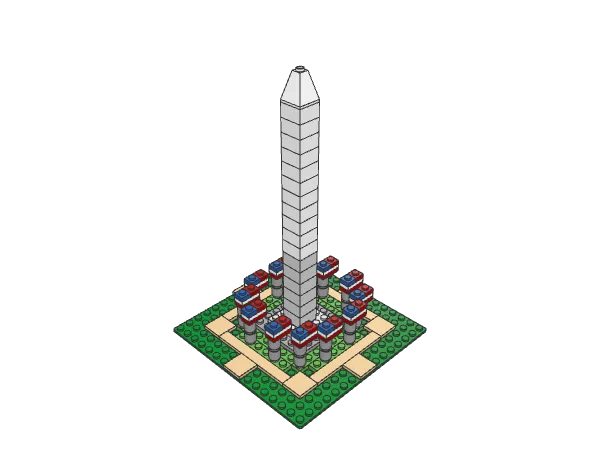
| Desk model | One 16 x 16 base, about 100 parts | The outline and one signature detail | Washington Monument, 112 parts |
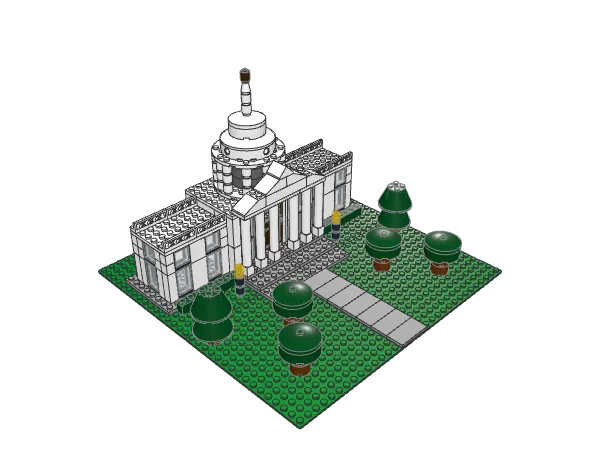
| Display model | 32 x 16 to 32 x 32 studs, 200 to 250 parts | The outline, the main details, a base with landscaping | US Capitol, 225 parts |
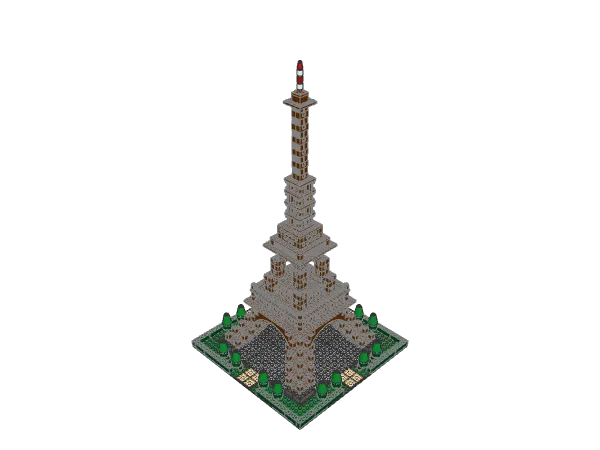
| Large display | 32 x 32 studs and up, 400 parts or more | Open structure, interior hints, a full setting | Eiffel Tower, 426 parts |
Smaller is not automatically easier. At desk scale you have very few parts to work with, so each one has to count. The Washington Monument model gets away with it because its subject is simple: a stack of seventeen 2 x 2 bricks, a pointed cap and a ring of flags. A building with many parts, such as a cathedral, needs more room before it reads at all.
If this is your first MOC, aim for the desk or display range. You will finish it, and finishing teaches more than a half-built giant.
Start from the silhouette
Most people recognize a landmark from far away, long before they can see any detail. That means the outline matters more than anything else. Get the silhouette right and the model will read even with plain bricks; get it wrong and no amount of detail will save it.
Measure the proportions in studs
Find a straight-on front photo and a side photo of the real building. Measure its overall width and height on the photo, then work out the ratio. A tower ten times taller than it is wide needs to stay ten times taller than wide in bricks.
Remember that a brick is taller than it is wide: one brick is a little more than one stud width in height, and three plates make one brick. So “20 bricks tall” is noticeably more than “20 studs tall”. The Washington Monument model gets its slender look from a shaft roughly ten times its own width, much like the real obelisk, because its height was counted in bricks against its two-stud width.
Sketch it on a grid
Draw the front view on squared paper with one square per stud, then the side view and the view from above. You will find most problems on paper: a roof that would need half a stud, a tower that cannot be centered on an even-width base. Fix the numbers before you start building.
Look for the dominant shape
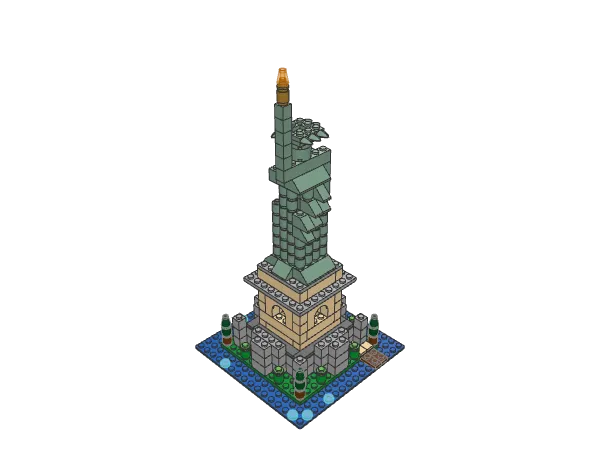
Ask what single shape a child would draw. For the Eiffel Tower, it is four legs leaning in, two platforms and a needle. The Eiffel Tower model builds exactly that: each leg climbs in six open truss segments, and each segment’s 4 x 4 plate sits one stud closer to the center than the one below, which gives the legs their inward lean. For the Statue of Liberty, it is the raised arm, the crown and the green robe, so nearly half of its 234 parts go into the figure itself.
Pick two to four true colors
Real buildings have dozens of shades, but a model reads best with a few strong ones. Pick a main color for most of the structure, a second color for the base or roof, and one or two accents for the details you want people to notice.
The landmark builds here show how far a short palette can go:
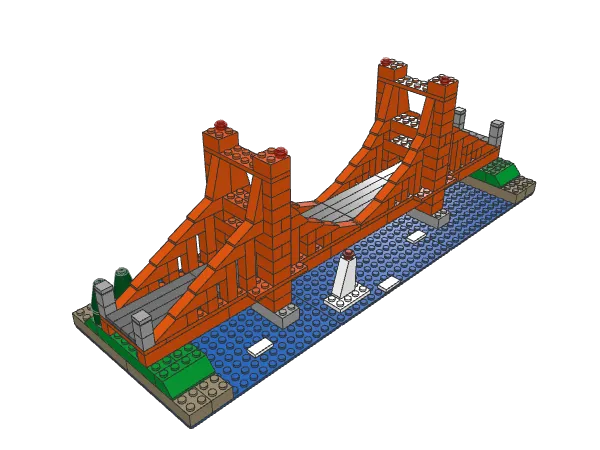
- The Golden Gate Bridge makes almost everything structural reddish orange, a close match for the warm paint of the real bridge, and sets it against blue water and a dark gray road. The color alone does half the work of naming the bridge.
- The Statue of Liberty uses sand green for the whole figure, 110 of its 234 parts, to suggest weathered copper, with tan for the pedestal and a gold torch as the accent.
- The US Capitol is white on a light gray terrace plinth, so the walls separate cleanly from the green lawn around them.
Check the contrast between the big areas: roof against walls, walls against base, base against ground. Two similar grays next to each other will merge into one muddy block when seen from across a room. If the real building has that problem, exaggerate slightly. The Temple of Heaven build, for example, puts bright blue roofs over red columns on white terraces, so each band stands apart.
Capture the details people recognize
Once the outline and colors are right, choose one or two signature details and spend parts on them. These are the features a visitor would name if asked “how do you know which building this is?”
Some examples from the builds on this site:
- The Capitol dome. On the US Capitol, the dome gets a stack of round parts: an 8 x 8 round plate carrying three rings of twelve 1 x 1 round columns around a dark gray core that reads as the shaded drum, then round bricks and dishes narrowing up to a lantern and statue. The wings are comparatively plain.
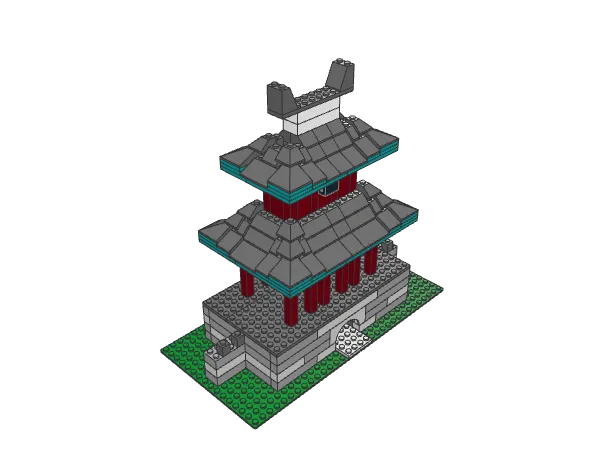
- Sungnyemun’s roofs. The Sungnyemun Gate gives most of its bricks to its two roofs. Each starts with 33-degree slopes and steps up to steeper 45-degree courses, and the slopes near the corners sit one plate higher than the middle, so the roof edge lifts toward each corner like the real tiled roofs.
- The Golden Gate cables. A curved cable is hard in bricks, but a run of slopes whose angle increases toward each tower (18, 33, 45 and then 75 degrees) reads as a curve from any normal viewing distance.
- The Eiffel Tower lattice. Above the first floor, lattice fence panels, technic bricks with holes and open window frames let you see through the tower, which a solid stack of bricks could never suggest.
None of these details needs rare parts: they are ordinary slopes, round bricks and fences, placed with care.
Simplify everything else
The hardest design decision is what to leave out. A model that tries to show every window, statue and cornice usually loses its outline under clutter. Some practical rules:
- Reduce repeated features. If the real facade has 30 windows, a row of five or six still reads as “many windows”.
- Change counts when you must, and know that you did. The Statue of Liberty build simplifies the star-shaped fort beneath the statue to eight points; the real walls have eleven. At this scale, eight fit the grid and still read as a star.
- Use texture instead of detail. The Statue of Liberty’s robe is 70 standing 1 x 1 round bricks; their rounded sides throw small shadows that read as folds in fabric, with no sculpting at all.
- Shorten long structures. A bridge or a wall does not need to be complete. The Golden Gate Bridge model compresses the span onto a 48 x 16 base and frames it with a piece of headland at each end, which tells the eye the bridge carries on.
Give it a base
A base turns a building into a scene. It also holds the model together, gives you a place to grip it and sets its colors off.
- Use a plinth for monuments. Raised terraces and stone platforms appear on many real landmarks. The Sungnyemun build has a granite base only four courses high, so the pavilion above it dominates. The Temple of Heaven build stacks a three-tier white terrace, each tier three layers of plates with the corners cut back.
- Add a little setting. A path, a few trees or a strip of water says where the landmark stands. The Washington Monument model surrounds its shaft with a round lawn, a tan path and twelve flags; the Eiffel Tower model rings its plaza with hedges and topiary trees.
- Keep the base quieter than the landmark. Greens, tans and grays work well around a building with a strong color.
Test it from every side
Build a rough version first, using whatever colors you have, and look at it from the front, both sides, the back, from above and from a low angle. Things to check:
- Does it read from across the room? Step back two or three meters. If you cannot tell what it is, the silhouette needs work, not the details.
- Is it sturdy? Lift it by the base and turn it. Anything that wobbles needs to be locked in from above or anchored deeper. Our guide to beginner building techniques covers overlapping joints and supported overhangs.
- Do the angles line up? Slopes facing the wrong way and roofs that do not meet at the ridge are easier to spot from above.
Make it buildable as instructions
If you want to share the design, or just rebuild it later, plan it in the order someone else would build it:
- Build bottom up. Every step should add parts that rest on parts already placed. A wall that must be lifted onto a base in one piece is hard for others to follow.
- Group the work into sub-assemblies. The Sungnyemun build goes base, lower storey, lower roof, upper storey, upper roof, ridge. Each step on the site adds one recognizable piece of the building.
- Repeat patterns deliberately. The Eiffel Tower legs add the same truss segment again and again, one stud further in, and the Capitol’s drum adds the same ring of twelve columns three times. Repetition makes a big build easier to follow.
- Note the tricky spots. If a slope has to face a particular way or a plate rests on only one row of studs, write it down as a tip for that step.
See the examples
The fastest way to learn is to take a landmark build apart in the viewer, step by step, and ask why each piece is where it is. The landmarks collection covers towers, temples, gates and monuments from around the world, and the American landmarks collection gathers the monuments and bridges of the United States. Pick one at the scale you want to design at, study how it solves its outline and its signature detail, then start sketching your own.